An introduction to Cluster Computing
Introduction
Lots of the analyses we run uses lots of RAM and/or takes a long time to compute on a workstation or laptop. A cluster (in general, not specifically this one) provides access to powerful computing resources that are shared between users.
In order to ensure a fair allocation of the resources, you cannot access them
directly but instead define so-called Jobs. A Job describes:
What to do. This is a call to a script with some parameters.
The resources needed for the
Job:How long does the job run?
How much RAM does it need?
How many CPUs and (in the future) GPUs does it need?
This information is sent to a the Scheduler which collects the requests
of all users and puts them in a queue.
It then allocates the resources fairly to the jobs in the queue.
The software we use here is called Slurm. It is a very powerful and complex piece of software. As already stated on the front page, you can write submit scripts yourself or use other packages or toolboxes to do so. Or you can use this package.
In any case, you should be familiar with a few concepts to use these resources as efficiently as possible.
Please bear in mind that this is only the bare minimum of information. If you want to know more, you can find lots of information on Wikipedia, Google, YouTube and, of course on the official website of Slurm.
The introduction will cover the following aspects:
What is a cluster?
How do I use the cluster?
What is a cluster?
General Remarks
In one short sentence: a cluster is a bunch of computers that are used by a bunch of people. These computers provide resources, in our case CPU power and memory, to all users. These resources have to be distributed as optimal and fair as possible between the users.
Here is a picture of how the system looks like:
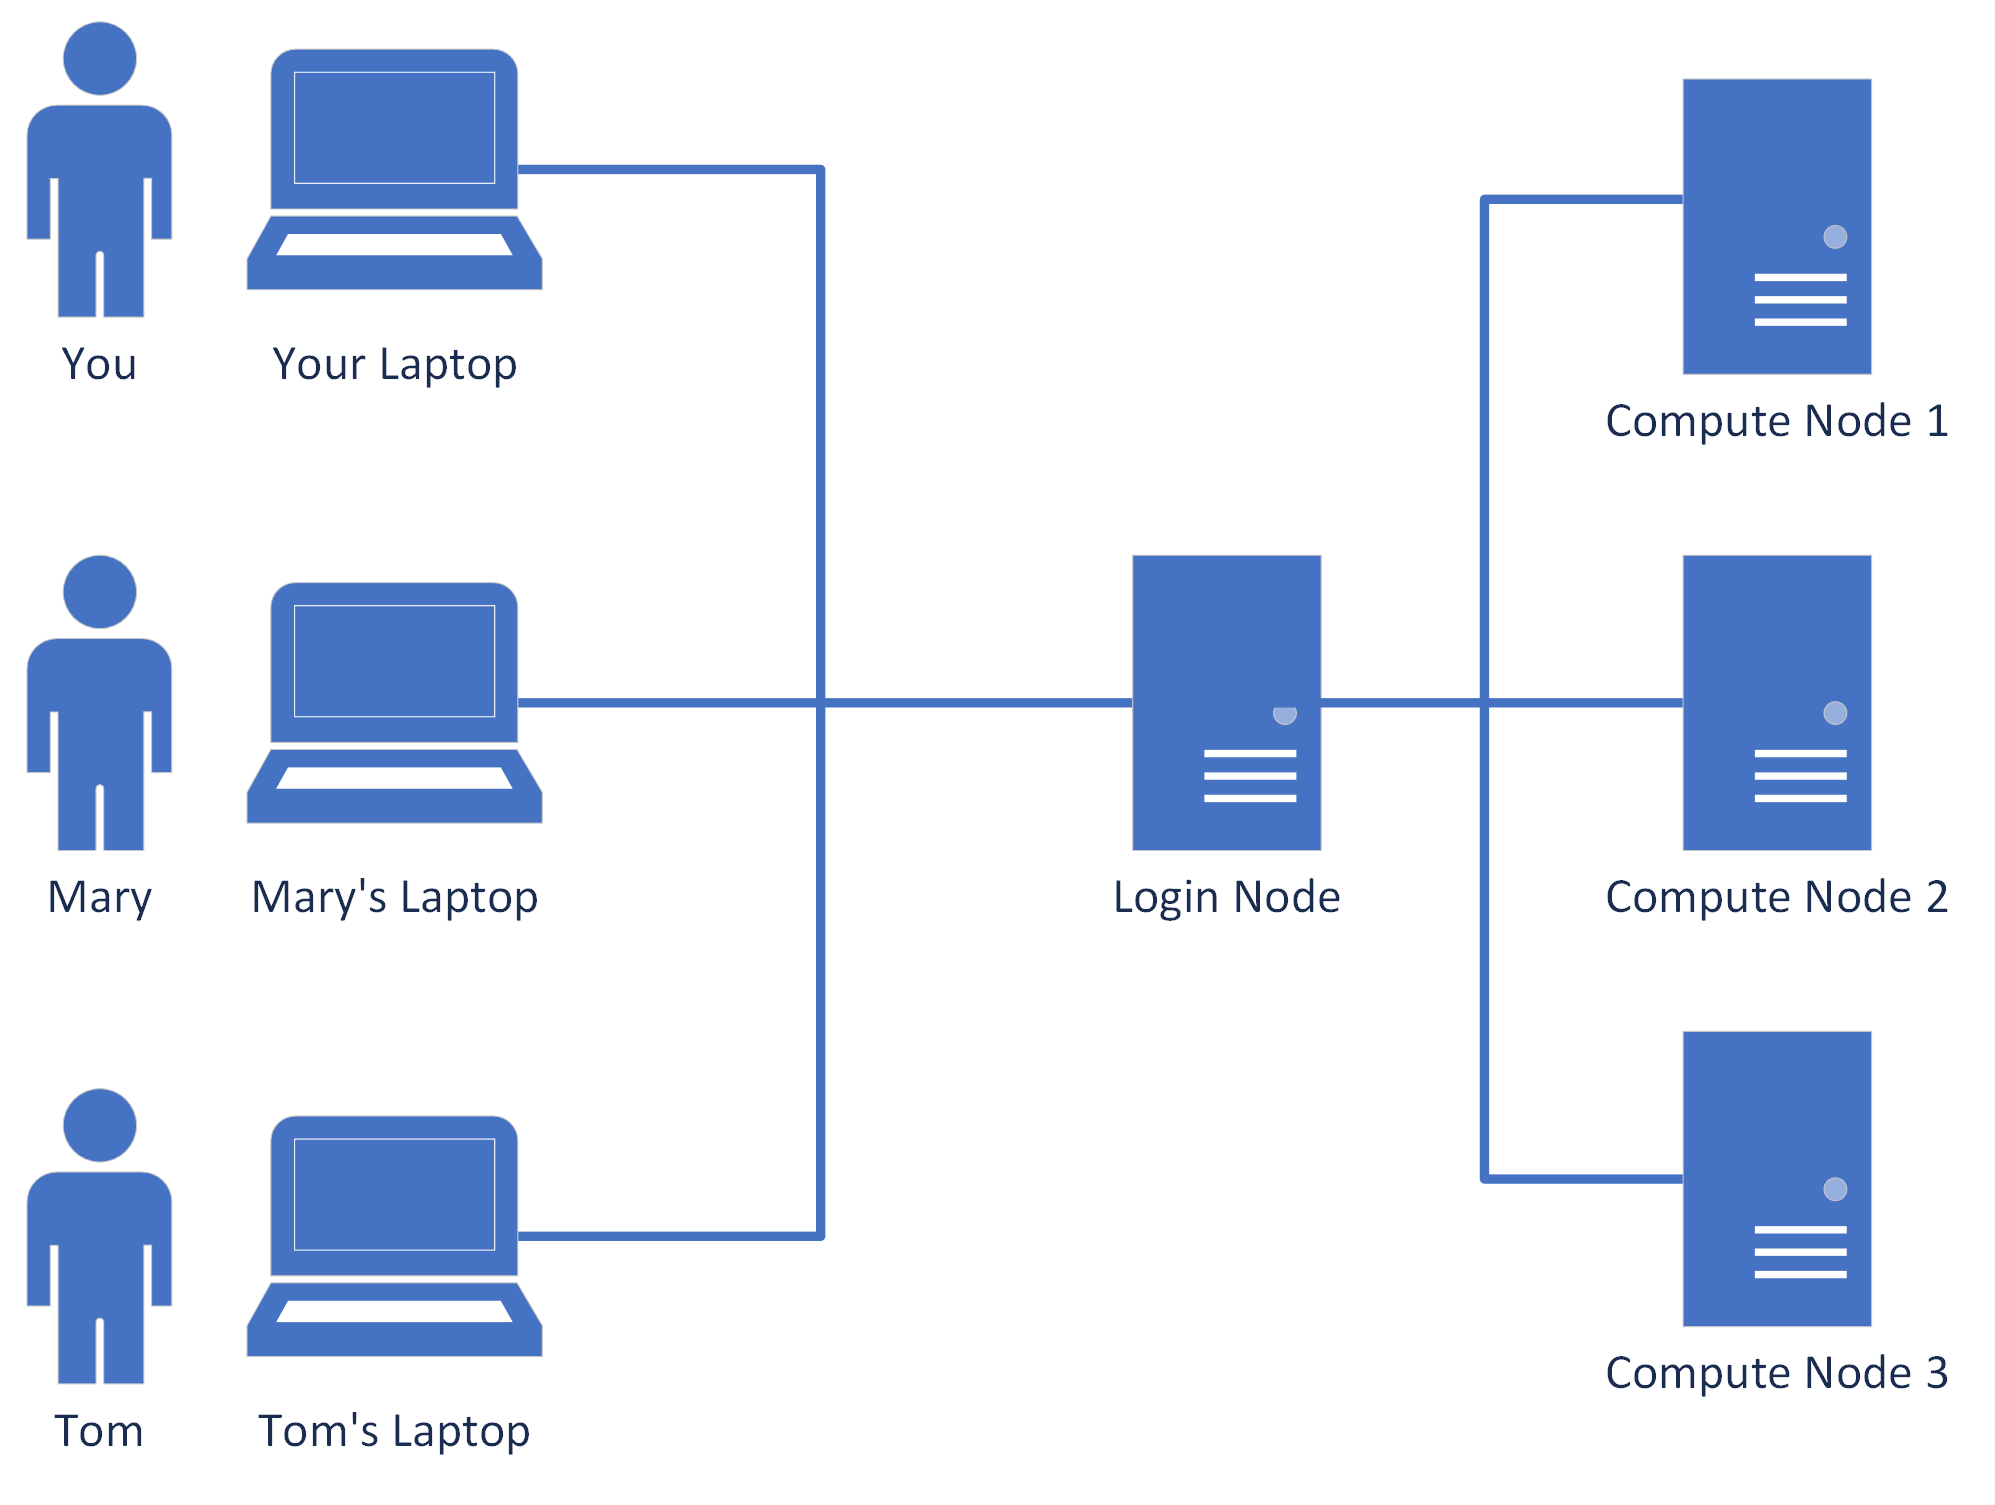
As you see, every user can connect to a so-called Login Node. You can do so
using xpra, the remote capabilities of Visual Studio Code or plain ssh. In any
case, the Login Node allows you to submit Jobs which then are put into a queue
at the so-called Scheduler. From there they get allocated to
one of the Compute Nodes.
As already mentioned, submitting jobs to the slurm cluster can be done using simple bash scripts or entirely from the command line. This package just makes it easier for you to define and submit these jobs.
About Fairness
Please always bear in mind that the Cluster is a resource that you share with all your colleagues. There are, of course, ways to use the system in your advantage while putting everyone else at a disadvantage. Please just do not! This system works best when everybody has everybody else in mind. And it also increases your Karma™.
As I wrote before, the Scheduler collects all the jobs by all the users who want to use the Cluster and then distributes it to the Compute Nodes. It tries to be as fair as possible in the distribution of the jobs. For example, if two people are submitting jobs at the same time, it will make sure that both get half of the resources. However, Slurm cannot guess how many resources like your jobs need. So, you need to tell it and try to be as exact as possible.
As described above, you need to tell the Scheduler:
How much RAM does you job need?
If your job consumes more RAM, it is going to get killed. If it consumes less RAM, less jobs run in parallel.
How many CPU cores can it use?
If your job could use more CPU cores than you specified, it will run slower. If it does not use all the CPU cores, less jobs can run at the same time.
How long does it take to run?
If your job takes too long, it will get killed. However, the shorter the time you specified, the earlier your jobs are going to run.
How do I use the Cluster?
If you want to use the cluster, all you need to do is to connect to the Login Node.
Your administrator should have told you the hostname you are supposed to use.
What is going on on the cluster?
To be able to monitor what is going on on the cluster, you first need to open a terminal.
Then, enter the following command:
squeue
You will see something like this:
 JOBID PARTITION     NAME     USER ST       TIME  NODES NODELIST(REASON)
79131_1    normal submit.s bob      R       0:02      1 scs1-26
79131_2    normal submit.s bob      R       0:02      1 scs1-26
79131_3    normal submit.s bob      R       0:02      1 scs1-26
79131_4    normal submit.s bob      R       0:02      1 scs1-26
79131_5    normal submit.s bob      R       0:02      1 scs1-26
As you can see, user bob has five jobs in the running (R) state. If you need
to remove or modify jobs, take a look at the first column, which tells you
the JOBID of the jobs. You also see, that in this particular case, the format
of the JOBID is JOBID_TASKID. The reason is that this is a so-called
Array Job. An Array Job applies the same code to different parameters
(like participants, conditions, etc). If you want to modify or remove all jobs
within an array, you can just use the part in front of the _.
Slurm offers a lot more commands to get information from the cluster. Take a look at this PDF cheat sheet and the manual pages for sinfo, squeue and scancel to find out more.
How do I submit my first job?
Go to How to use plus_slurm and find out!
If you want to use Matlab, a similar toolbox exists within obob_ownft. Documentation will follow there soon.